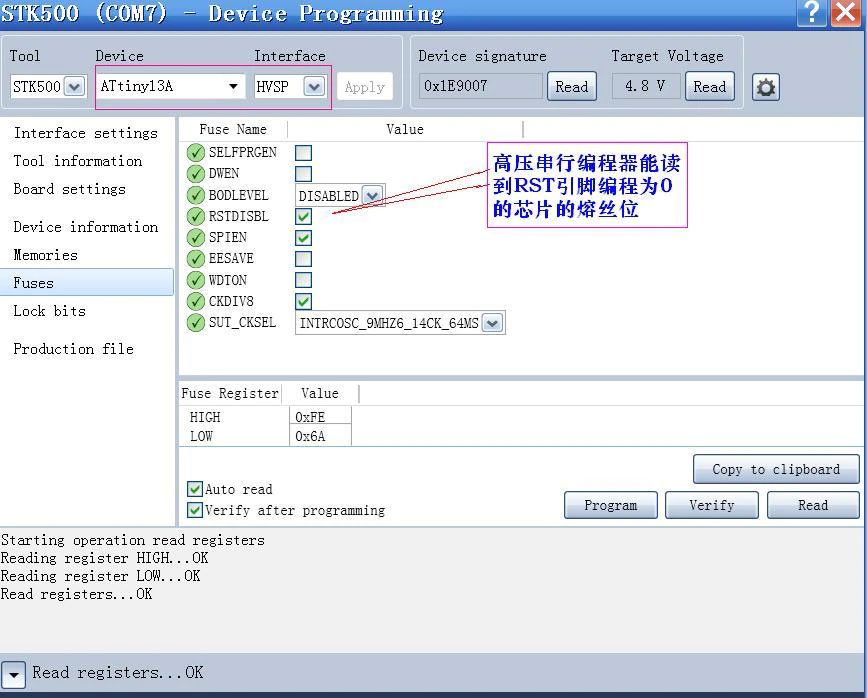
The only way to re-enable Reset or SPIEN fuses on some older AVR chips like ATtiny13A, to allow them to be reprogrammed, is to use High Voltage programming (HVP) method. This was available on AVR Dragon, STK500 and STK600 but since these have been discontinued, there is a lack of suitable programmers.
So, what is now the best solution for AVR High Voltage Programming?
High Voltage Serial Programming is a separate programming method and this does not apply to newer ATtiny devices with a Tiny Programming Interface (TPI) such as ATtiny10. These just need a 12V pulse. Some UPDI devices also need 12V if UPDI pin is reset as GPIO – see end of post for more details.
Microchip seem to have completely ignored this issue and AVR ICE and other current tools do not support HVP. Nor does AVRISP-MKII but we are still asked to recommend a solution.
There are 2 possible solutions we have found, a low cost Chinese programmer described below or build your own using an Arduino with some external circuitry, using STK500 interface. Here are a few sketches that are available – AVR High Voltage Programmer or Arduino HV Programmer.
Chinese AVR HV Programmer
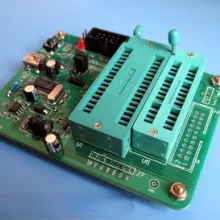
The best we have found is an AVR High Voltage Programmer, available from multiple sellers on AliExpress (search for AVR High Voltage Serial Programmer on www.aliexpress.com ).
They vary in price from $20 to $30, with free shipping, but there are different versions with different colours. The latest version seems to be V6.4, which is green, has SMD components and a 28-pin SSOP Prolific USB chip. This link was okay in January 2022 – AVR HVP v6.4
China post usually takes about 10-12 days to Europe or US but can take up to 4-5 weeks in rare circumstances.

We have tried it and it works very well as an STK500 in latest Microchip Studio but there are 2 issues that let it down. One is USB driver and second is lack of documentation.
1. Prolific USB Driver
Like many other low cost Chinese products this programmer uses knock off versions of Prolific USB chips. The latest drivers for these chips, especially in Windows 10, have caught up with these fake devices and driver will not install or will give Code 10 error.
The only solution is to roll back the driver to an older version. If you do not already have an older Prolific driver installed that you can roll back to, you will have to get an older driver. This process is described here.
If you are not happy with a product that uses counterfeit chips, or can’t cope with USB driver changes, then do not buy it! We do not stock it for this reason but it is the only programmer we have found that will reliably do HVP for AVR microcontrollers.
2. Lack of Documentation
As a typical low cost Chinese product, it does not come with any documentation and we can’t find any online as we are not sure who actually makes it, rather than just reselling it.
The descriptions on AliExpress have all obviously been copied from a common source and are quite good at explaining how to use it in Studio as an STK500, for both HV Serial and HV Parallel programming. It will also do standard ISP.

There are no schematics or other information for it but some pin-outs are shown on the back of the PCB. The 10-way ISP connector is standard Atmel pin-out.
If you have no experience of AVR programming, then this lack of a user guide means you should think twice before buying it.
Programmer description
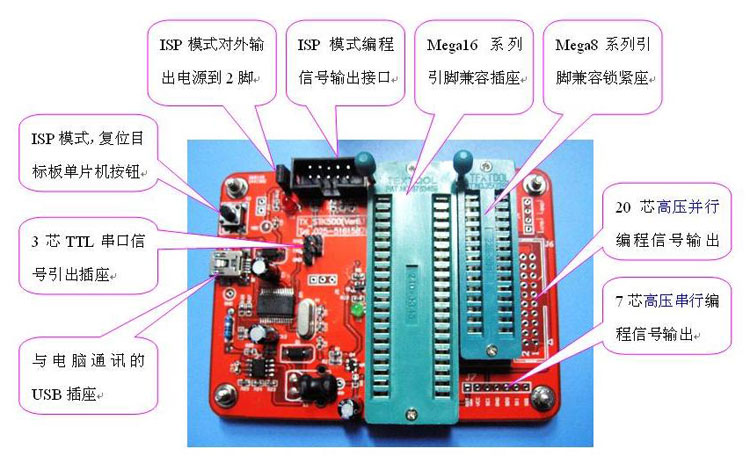
The board has 2 ZIF sockets for parallel programming ATmega8 and ATmega16 chips. Here is the board, with Chinese captions but enough English to understand it.

For other chips, a 20 pin unpopulated header pad layout is provided. Luckily the pin designations are screen printed on the PCB underside, but the pin designations do not line up with those of the AVR Dragon, which meant that the connection diagrams printed in the Dragon user guide are not usable without pin number conversion. (A very laborious task).
It also has a 7-way unpopulated header for HV serial programming, which has been added as a separate connection, although the same pins can be found on the 20 pin header.
It also has a 10-way ISP header that can be connected to any ISP target, like Arduino boards. You will need a 10 to 6-way adapter if your targets use 6-pin ISP header.
There is also a jumper link to supply Vcc from the USB port to the target chip, which can come in handy at times as long as the target does not require much current. The supply from the USB port has a diode in series to prevent any voltage from the target being fed back to the PC but this reduces the voltage at the ISP to roughly 4.3 V, which usually will not be a problem.
Restoring Reset on ATtiny TPI Chips
ATtiny4, 5, 9, 10, 20, 40, 102 and 104 use TPI interface and on these chips Reset can be configured as GPIO. If this is done, they can’t be reprogrammed with a standard programmer without a High Voltage Pulse on Reset.
Here is the method using PICKit 4 but it would be the same with other programmers.
- Disconnect the reset pin connection between the PICkit and the ATtiny (the other 4 connections remained intact).
- Power up the ATtiny at 5V from the target board.
- Connect the reset pin of the ATtiny to +12V from a bench power supply.
- Initiate programming (using Microchip Studio) and the programming sequence works correctly.
- Disconnect the +12V supply and PICkit 4.
Presto and Forte programmers and Kanda Handheld programmers have checkbox on ATtiny TPI devices to select a 12V pulse if this is needed to re-enable Reset.
AVR UPDI Devices
Latest AVR chips use an UPDI interface for programming. This is a 1-wire protocol that uses UPDI pin. On some chips, the UPDI pin can be reconfigured as GPIO using a fuse setting.
If this fuse is set, 12V is needed on UPDI pin or, in later microcontrollers like AVRxxDD series, on Reset pin to enter UPDI programming mode. Kanda handheld programmers can supply this 12V pulse.
Conclusion
Despite its weakness, this programmer will do the job if you require High Voltage serial or parallel programming or need to reset fuses on ATtiny devices. It is not for the complete amateur as some experience is needed to use it effectively.
If you just need standard ISP programming with 12V for TPI and UPDI interfaces, then other programmers are better
https://www.kanda.com/products/Kanda/AVRISP-U.html
https://www.kanda.com/products/Kanda/AVRISP-MKII.html
https://www.kanda.com/products/Kanda/AVRUPDI.html
Thanks to Albert Hubbard of Hubbard Tech in Australia for reviewing this product for us.
